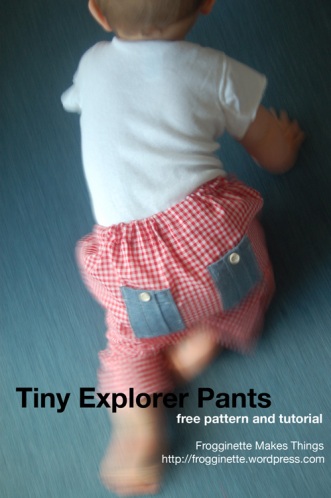
FREE: Tiny Explorer Pants pattern and tutorial

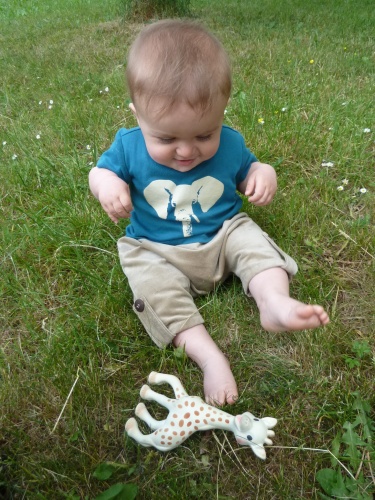
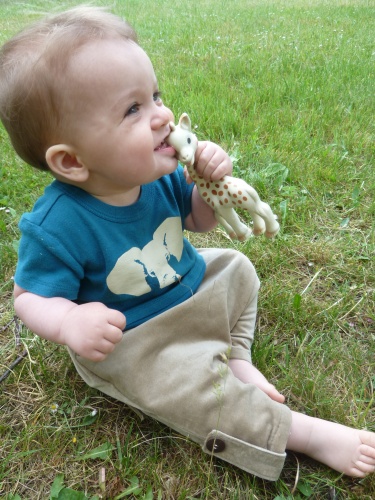
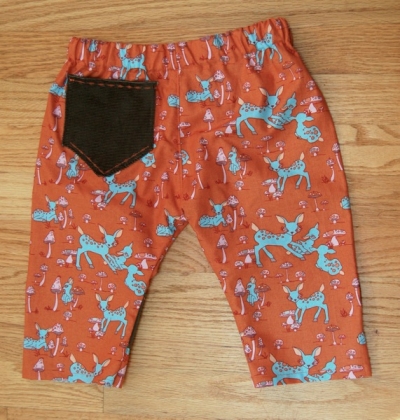
I wanted simple pants for my almost 1-year-old that could be sewn during nap time but still have cute details. They had to be comfortable and roomy in the diaper area but not ride up the leg when crawling. I could imagine a hundred customizations of this very basic pattern! I hope you’ll have fun with it 🙂

Pour le tuto en français et le patron, cliquez ici!

Click here for pattern. Scroll down for step-by-step tutorial:

PLEASE NOTE: I’ve made this pattern available for free for your personal, non-commercial use. I hope you enjoy it! Please don’t post, copy or distribute any elements of this pattern (including the photos). Instead, please link back to my blog, Frogginette Makes Things, https://frogginette.wordpress.com. You can post the main pattern photo as long as you link back/give credit.

Please email me at lchemery(at)hotmail(dot)com if you find any errors, thank you!!


You will need:

  • – a printer and 3 sheets of A4 size (i.e. “regular” sized) paper. A word of caution: set page scaling to “none” in the print window to ensure that the pattern gets correctly printed.
  • – about 1/2 yard of fabric + scraps for pockets and tabs if you want to  make them from contrasting fabric
  • -1/2” to 3/4” wide elastic for waistband: the length I used was 19”, which is my son’s waist measurements minus 1″ (for optimal fit, measure it on your child)
  • – 4 buttons: 2 for pockets, 2 for tabs
  • – safety pin to insert elastic band into casing
  • – thread / pins / scissors…

Note about size: This pattern is intended for 1-year old babies. I’m sorry I don’t have the time or skills as of yet to grade this pattern and offer more sizes. However, it would be very easy to modify it for slightly older or younger babies (probably from 6 months to 2 years old): 1) adjust length of elastic to fit your child at waist 2) just add (for bigger size) or substract (for smaller size) 1 to 2” from leg length, pant width and crotch rise.

INSTRUCTIONS:

1- Print out and cut all pattern pieces and tape pant pieces together along lines A and B

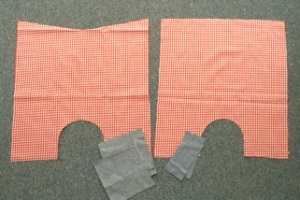
2- Place assembled pattern along fabric fold, cut back side of pant (seam allowances are already included). Fold top of pattern piece along diagonal fold line, place pattern along fabric fold, cut front side of pant. (Tip: if you want, you can then make the “V” at the front of the pants slightly rounder, it will make it easier to do the waist casing.)

3- Cut 2 pockets and 2 side tabs (seam allowances are already included).

You should have 6 pieces total: front, back, 2 pockets, 2 tabs.

4 – To make pocket (repeat twice):

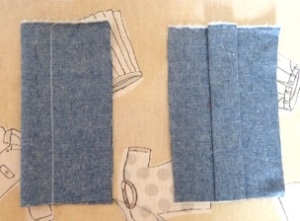
Fold pocket in half (wrong sides together) and sew down 1” from folded edge (as shown on left-hand side on below pic). Then open and press the tube you’ve sewn down:

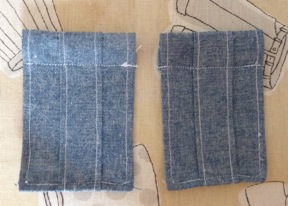
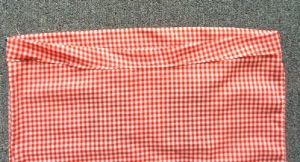
Fold 1/2” under the sides, then bottom of the pocket, press down and sew the hem in place about 1/4” from edge. Then fold top of pocket under 1/4”, then 1”, press down and sew the hem in place across the pocket width, about 3/4” from top of pocket:

Note: I didn’t make any buttonholes since the pockets are not functional, but you could easily add some at this stage!

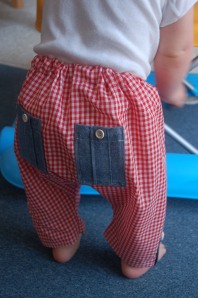
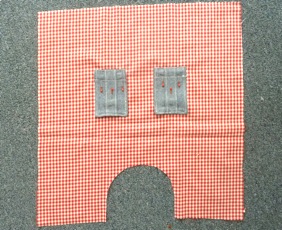
5- Pin pockets to back of pants (on right side of fabric). I placed mine approximately 4” above crotch and 4.5” from side edges:

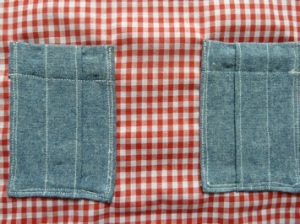
Sew pockets onto pants along outside of topstitched line:

6- Make tabs (repeat twice): fold each tab lengthwise with right sides of fabric together and press down. Sew 1/4” down length, then across. Clip corners. Turn the tube you’ve made inside out, and tuck in the raw edge 1/4”. Press down. Sew all around, 1/4” from edges.

7- With right sides of fabric together, sew front and back of pants together along side seams, 1/4” from edges. Serge or zigzag raw edges to prevent fraying.

8- Hem pant leg by folding 1/4” under twice and sewing hem into place. Do this for each leg.

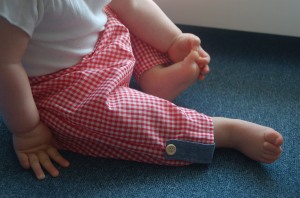
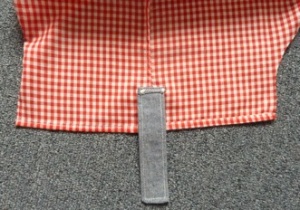
9- Open pant side seam and with wrong side facing you, pin tab over seam so that slightly more than half of tab sticks out, as shown in below photo. Sew top of tab to pant leg. Do this for each tab. (Note: as with the pockets, I didn’t make any buttonholes but you could easily add some at this stage)

10- With pants inside out, sew 1/4” along crotch seam. Serge or zigzag raw edges to avoid fraying:

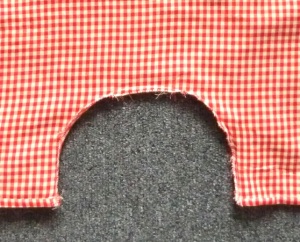
11- With pants still inside out, fold under 1/4”, then 1 1/4” for hem. Press down, making sure that front curves and dips evenly. Sew around hem, leaving an opening of about 2”:

12: Using a safety pin, insert elastic inside of casing through opening. Zigzag ends of elastic together. Make sure the elastic is not twisted. Turn pant inside out, sew buttons onto side tabs and pockets. VoilĂ !

DĂ©fi’13: Sa(fari)ouel

Notre explorateur intrĂ©pide perçoit d’abord un bruit… comme un couinement Ă  peine perceptible…

D’un bond souple, il s’Ă©lance sur les traces de sa proie…

… et s’avance tel un guĂ©pard, Ă  pas rapides et feutrĂ©s…

Enfin! Notre chasseur est nez-Ă -nez avec sa victime!

Et son regard fĂ©roce dissuade tout rival de la lui disputer…

Une lutte sans merci s’ensuit…

Jusqu’au coup de grĂące!

Et notre chasseur triomphant savoure une victoire bien méritée!

2 chutes de rideau en velours

+

2h de sieste de l’explorateur

=

une petite bidouille style safari/savane, que je referais bien dans un tissu un peu plus pratique Ă  coudre, comme du lin ou du vichy… C’est tellement facile que je vais essayer de faire un petit tuto!

The DĂ©fi’13 challenge is a monthly knitting or sewing project in the French blogosphere (hence the return of French on this blog). The challenge’s theme this month was The Savanna, so with 2 hours to spare and no pattern, I grabbed a leftover piece of velvet drape and improvised these little sarouel pants, which I thought were very safari-like. It’s so simple that if I can find the time in the next week or so I will put together a how-to. I think this would work particularly well in linen or gingham.

For a special boy I know

~~

Voici deux petites choses pour Dil, le neveu de Gabe, qui, à trois ans et demi, a déjà un style trÚs funky (pas trop le genre à porter du Liberty)

J’espĂšre que ça lui ira, vu que je ne l’ai pas vu depuis bien longtemps! Donc zou, une petite chemisette (il a usĂ© la derniĂšre que je lui ai faite jusqu’Ă  la corde!), et un petit bermuda long. En plissant un peu les yeux ils vont super bien ensemble 😉

J’ai choisi des tissus plein de bestioles amusantes et des boutons-numĂ©ros pour apprendre Ă  compter, comme ça c’est plus rigolo pour lui!

~~

octoshirt

~~

CUcollar

~~

pantsfront

~~

pantsback1

~~

CUpocket1

~~

I just made these two things for Dil (Gabe’s nephew) whose style is already quite bold, even though he is only 3 years and a half.

I hope they fit, as I haven’t seen him in a while. I decided to make him another button-down shirt (the last one I made for him was worn to death), and below-the-knee shorts. If you squint a bit, they even sort of go together!

The fun critters and some numbered buttons ought to grab his interest for about 3 seconds and a half =)

Et nos hommes dans tout Ă§a?

Quand mon chĂ©ri est par monts et par vaux, il me maaaanque c’est fou ce qu’il me manque… Et je rĂ©alise que je pourrais ĂȘtre plus sympa et lui faire des petits cadeaux home-made plus souvent…

D’oĂč:

Comment ça le ruban rose c'est pas trÚs masculin??

Comment ça le ruban rose c'est pas trÚs masculin??

boxersshorts

Quel luxe!

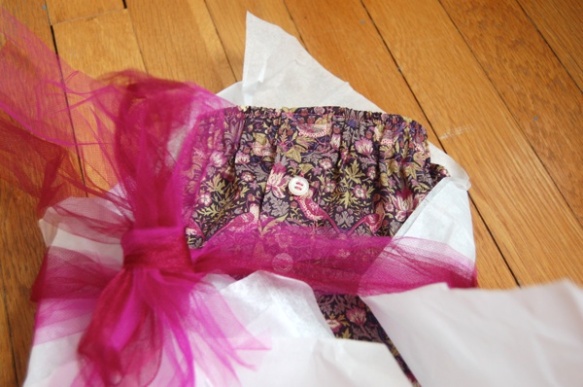
Un caleçon en Liberty Strawberry Thief, fait avec amouuuuuuur. (Patron maison)

Maintenant il en veut d’autres, mamamia!

photocabinepic

Merci Fred pour l’idĂ©e de la photocabine!

Et vous le vĂŽtre, d’homme, il est plutĂŽt goguenard envers vos crĂ©ations tricot/couture? Ou bien souffre en silence de passer aprĂšs tout le monde?

Last week-end I decided that for once, I should make something for Gabe, who is so supportive of my knitting and sewing. So ta-da!  Liberty boxers! How luxurious, right? My man deserves only the best! What about yours? Do you make things for him sometimes, or would he rather you didn’t? 😉

Madras challenge! EDIT PHOTOS

~~

EDIT du lendemain: la lumiĂšre du jour, c’est quand mĂȘme mieux pour les photos!

Ce fut ric-rac, il est minuit et demi chez moi, mais il fallait que je finisse Ă  temps pour la deadline de demain! (midi! C’est-Ă -dire 6h30 6h du mat ici (j’Ă©tais vraiment trĂšs fatiguĂ©e faut croire, merci Claire!)…

AprÚs une bonne nuit de sommeil la séance photo se passe nettement mieux!

~~

porte


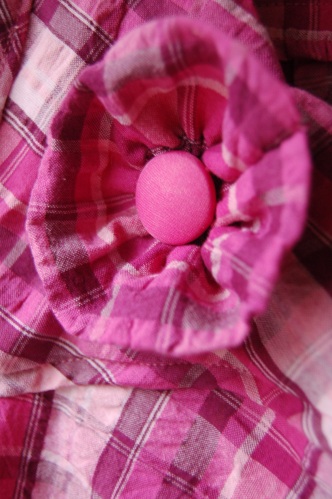
Du rose et une fleu-fleur... c'est du top de fille ça!

Du rose et une fleu-fleur... c'est du top de fille ça!

fleur


~~

VoilĂ ! J’ai hĂąte de voir les crĂ©ations de tout le monde!

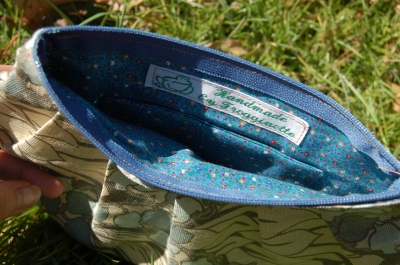
My buttercup pouch

~~

buttercuppouch

~~

buttercupinside1

~~

Voici ma version du Buttercup Bag de Rae dont je vous ai parlĂ© la semaine derniĂšre. J’en ai fait une trousse parce que je n’utilise que des sacs trĂšs contenants et celui-ci est plutĂŽt mini. Le patron est trĂšs clair, avec des photos et tout, jetez-vous dessus! Petit rappel: pour le patron (gratuit) c’est ici!

~~

Here’s my Buttercup Bag, which is really a pouch. Isn’t it darling? I love the pattern and might even try to not mess it up next time (for some reason I made the opening a bit smaller than I should have… not sure what happened there but it doesn’t really matter in the end).

I’m off to post this in Rae’s Flickr pool! You guys should all make one — as a reminder, it’s FREE and available here.

Spring-inspired nightie

~~

dsc_05391

~~

Bien entendu, le Morning Kimono Ă©tait Ă  peine tombĂ© des aiguilles que les tempĂ©ratures ont commencĂ© Ă  grimper. Qu’Ă  cela ne tienne, j’ai rĂ©pondu du tac au tac avec cette nuisette printaniĂšre. C’est une impro totale (vous commencez Ă  avoir l’habitude, non?) et si c’Ă©tait Ă  refaire, je changerais l’encolure, qui me chiffonne un peu (et n’est pas assez dĂ©colletĂ©e). Mais mon chĂ©ri me dit qu’il l’aime beaucoup telle quelle! Ouf! =)

~~

Wouldn’t you know it, no sooner had I finished my Morning Kimono than the temperatures started climbing. So I fought right back and came up with this little nightie. It’s an improv (you know me, by now) and if I had to make it again I’d change a few things, like the neckline, which I think is too high. But Gabe apparently approves of it as is! That’s all that matters =)

~~

dsc_0519

~~

dsc_0525

~~

Fabric/Tissu: pinking flower by Kaffe Fassett for Rowan,

Check it out: great free pattern

~~

~~

Un petit billet pour vous signaler que le patron de cet adorable petit sac est disponible gratuitement chez Made By Rae, un de mes blogs favoris. Rae mettra aussi trĂšs bientĂŽt en vente un patron de sac Ă  dos pour enfants dans sa boutique Etsy.

~~

A quick heads up to let you know that you can download the pattern for this cute little purse at Made By Rae, one of my favorite blogs. Rae will also soon be selling a fantastic children’s backpack pattern in her Etsy store.

A good idea

Vite un petit billet pour vous faire part de ce super tuto par Clevergirl

Parfait pour le Printemps, non? (je ne dĂ©sespĂšre pas!!) Et aussi pas mal pour recycler les immenses chemises de son homme  – vous savez les fois ou on a voulu bien faire, mais oĂč on a vu un peu trop grand!

Et on ne s’affole pas, pour celles qui ne comprennent pas bien l’Anglais: le tuto est tout en images!

~~

Before / After via Craftzine Blog

Before / After via Craftzine Blog

~~

Just a quick post to share this great tutorial by Clevergirl. Perfect to give a second life to these way-too-big shirts we bought for the men in our lives!

Retro Skirt

~~

Quand il s’agit de couture, il y a une Ă©tape que je trouve vraiment trĂšs pĂ©nible: Le Patron.

DĂ©plier correctement le papier hyper fin, trouver la bonne taille, avoir assez de place pour Ă©taler tout le coupon bien comme il faut, dĂ©couper le tissu sans se tromper de sens etc… Bref, trĂšs souvent tout ça m’ennuie beaucoup et je m’impatiente…  Et je finis donc par bidouiller mon propre patron, en prenant de trĂšs grands risques parce que dans ces cas-lĂ  on ne pense pas toujours Ă  tous les dĂ©tails et on peut faire de trĂšs grosses bĂȘtises…

~~

Et bien lĂ , ma foi, je suis trĂšs, mais alors trĂšs contente de mon petit modĂšle maison!

Le coupon vient d’un magasin de charitĂ© style “ArmĂ©e du Salut” et je suis sĂ»re que c’est de la laine vu comme j’ai dĂ» slalomer entre les trous de mites!! Bref, je ne prenais pas trop de risque, ce n’est pas comme de tailler dans un coupon de Liberty, vous voyez??

~~

When it comes to sewing, I usually get really frustrated with the first step: unfolding, figuring out and pinning the pattern pieces to the fabric correctly. For some reason, I get really impatient and more often than not, I end up putting away the pattern and improvising something on the spot. Very risky strategy, as it’s tough to think of all the details ahead of time and you can end up with a big mess…

Well, this time around, I’m actually very happy with my little homemade design! I bought the fabric in a thrift store, and given all the moth holes I had to cut around, I’m pretty certain it’s wool 😉 Anyway, I wasn’t risking any fancy fabric on this experiment…

~~

skirtfront41

~~

~~

skirtside skirtback

~~

Donc voilĂ  la bĂȘte, un peu rĂ©tro comme j’aime, je me suis bien amusĂ©e Ă  jouer avec les rayures. Elle est lĂ©gĂšrement trop grande — tombe un peu sur les hanches, mais ce n’est pas plus mal comme ça…  Une jupette bien sympa pour finir l’hiver!

~~

In the end, I think the gamble paid off, I really like the fit (it’s just a tad bigger than I wanted it to be, but still ok), and love the retro flair…. I had fun playing with the stripes of the fabric, as you can see!